Uploading & Troubleshooting Prescription Documentation
The purpose of this article is to:
- Help you to determine when a new prescription is required.
- Outline how to upload a prescription (referral / recommendation / order) for preschool related services.
- Help you to determine whether you have a valid prescription uploaded for each child on your caseload (Reports).
- How to “un-attach” a prescription from an enrollment.
- How to delete a prescription.
- Help you to troubleshoot the reasons why you were not successful with the upload process.
-------------------------------------------------------------------------------------------------------
WHEN IS A PRESCRIPTION REQUIRED FOR MEDICAID RELATED SERVICES?
Prescriptions are required for each IEP period as noted below. *
- Annual Review meeting (If the summer session is on a separate IEP from the winter session, a prescription for each session is required.).
- Whenever a review meeting results in a change in service (frequency/duration/class size); however, a prescription is required only for the service that was changed. The unaffected service(s) do not require a new prescription.
- Child transfers to another school district (transfer meeting).
- New Referrals (newly-identified students).
* Important Note: The “As per IEP” reference to the frequency and duration does not apply once the IEP changes. A new prescription is required for any of the circumstances listed above.
HOW TO UPLOAD A PRESCRIPTION FOR PRESCHOOL RELATED SERVICES
Before you can upload a prescription to the Portal you must scan and save the prescription to your computer.
- You can upload a prescription three ways:
- Lookup>Child Lookup (for a single Rx entry, use this option)
- Caseload Management>Prescriptions for Caseload (for therapists)
- Prescription Entry Maintenance (Billing Admins)
- The three ways to upload a prescription are highlighted below. The instructions for the prescription upload and prescription entry process is noted after the three options are shown.**
1. Lookup>Child Lookup>Type the Last Name of the Child (last, first)>Click Search>Click Details 
** Prescription Entry/Prescription Upload Instructions are noted below.
2. Medicaid>Prescriptions>Caseload Maintenance>Prescriptions for Caseload >Click the Rx Entry, Rx Image or Create Speech Recommendation link
This screen will list the prescriptions on your caseload and show the status (invalidated, entered or verified). If you are an SLP, it will also show a link to "Create Speech Recommendation." If a prescription entry has not been completed or the prescription image has not been uploaded, the link will indicate "Enter Rx Info" or "Upload Rx Image." The links in the table will take you directly to the correct screen to view, enter or upload.
** Prescription Entry/Prescription Upload Instructions are noted below.
3. Medicaid>Prescriptions>Prescription Entry Maintenance>Type the child's name (last, first)>Click Search>Click Select
This screen will show the status of the prescription (missing, verified or entered). You can view, edit or delete from this screen.
After you determine which menu option (above) to use, proceed with the following steps.
- Click Upload Prescription Entry (Details), and
- Click Upload the Prescription Image
1. Click on UPLOAD PRESCRIPTION ENTRY
- From the drop-down, enter the Order Type
- Enter the Provider
- Enter the Ordering provider’s NPI #
- Enter the Date the order was signed
- Under Prescription Effective Date Range, enter one of the three options:
- Applies to Enter School Year – 7/1/ - 6/30 (This is the default option)
- Applies to Specific School Year/Session – 7/1 – 8/30 or 9/1 – 6/30
- Applies to a specific date range that is entered onto the Rx.
Important Note: Make sure the correct school year is entered; especially when you are working within two school years. This is important because the enrollment(s) that need to be selected at the bottom of the screen must coordinate with the prescription term of service dates.
- Enter the ICD code (and/or reason/need for service)
- Enter the Frequency
- Either “Per IEP” (This is the default option), or, Specific Frequency (e.g., 2x30 weekly)
- Select the coordinating enrollment(s) that the prescription covers.
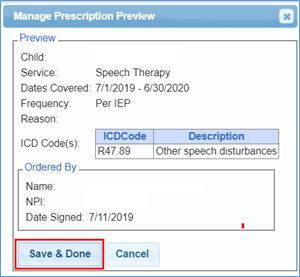
- Click Preview
- Click SAVE & DONE
- Now you need to attach the image to the Prescription Entry.
2. Click UPLOAD PRESCRIPTION IMAGE
(Note: You should have already scanned the prescription image to your computer so you can browse to the image as noted below.)
- Click Choose File
- Enter Provider
- Enter School Year (Important to select the correct school year)
- Enter a Description (optional)
- Enter the Ordering Provider NPI
- Enter the Date the Order was signed.
- Click the box next to the Order Detail for the prescription.
- Click SAVE
After clicking save, you should see this message displayed.
HOW TO PRINT YOUR PRESCRIPTION
Go to Lookup>Child Lookup
- Type in the name of the child>SEARCH
- Click Details
- Click the Written Orders Tab
- You will see two tables: Prescription Images and Prescription Entries
- Click the "manage" link in either table to view the Rx.
- Click "View Order File" or View Image." The prescription will come up.
- Right Click and select Print
- Click Print
REPORTS
Do you have a valid prescription uploaded for each child on your caseload? Here are some reports to help you manage your prescriptions. Checking these reports from time to time will let you know the current status of what is uploaded verses what is outstanding.
- Medicaid>Missing Documents>Missing Documents Preventing Claiming or Missing Scripts
- Medicaid>Prescriptions>Prescription Entry Maintenance (View, Edit or Delete Rx)
- Enrollments Needing Prescriptions (Add New Rx, Assign to Existing Rx, Upload Image, Report Problem)
- Prescription Details Without Images (Rx Entries without Images)
- Images Without Prescription Details (Rx Images without Prescription Details)
HOW TO UN-ATTACH A PRESCRIPTION FROM AN ENROLLMENT
- Go to Caseload Maintenance>Prescriptions for Caseload
- Click “VIEW” next to the Rx Entry.
- Uncheck the boxes for the enrollments that do not apply to the prescription
- Click PREVIEW
- Click SAVE & DONE
HOW TO EDIT OR DELETE A PRESCRIPTION
- Go to Medicaid>Prescriptions>Prescription Entry Maintenance
- Type in the last name of the child for whom you would like to edit or delete>click Select
- Click on either the Prescription Entries Tab or the Prescription Images Tab to edit or delete.
- Click the “VIEW” or “EDIT ENTRY” link to make sure that this is the image and/or order details that you would like to edit or delete; close and return to the Prescription Entry Maintenance screen.
- Click the “Delete” or “Edit Entry” link.
To Delete:
To Edit:
Go to Medicaid>Prescriptions>Enrollments Needing Prescriptions>Filter for School Year Session and/or Provider>Click RETRIEVE to see the list.
This report will allow you to:
- Add a new Rx,
- Link enrollments to the Prescription Entry,
- Upload an image to the Prescription Entry,
- Add a speech recommendation, or,
- Report Problem.
If you need to view a prior or subsequent school year, use the drop-down filter at the top of the screen and click Retrieve
TROUBLESHOOTING
Have you uploaded a prescription to the Portal, but it keeps showing up on the Missing Documents Report? Listed below you will see some reasons why you could not complete the process.
The Prescription Upload Process consists of the following steps:
- Scan prescription(s) to your personal computer (so you can browse to the prescription during the upload process.).
- Enter the Prescription Details and select the coordinating enrollments for the prescription.
- Upload the scanned prescription image, fill in the Manage Prescription File Screen and select the Eligible Orders at the bottom of the screen.
If all these steps are not completed (as noted below), the prescription will show as missing.
- You filled in the Prescription Entry Screen, but did not attach the image of the prescription, you will see the link "Attach to Image." If you click the link, you will be able to add the image and complete this process. -- or --
- You filled in the Prescription Entry Screen, but did not select the coordinating enrollments that the prescription covers at the bottom of the screen. -- or --
- You may have uploaded an image and completed the prescription entry, but neglected to select the orders at the bottom of the Manage Prescription File Screen (for the image) as noted below.
Another place to check for missing images is Medicaid>Prescriptions>Prescription Entry Maintenance
Prescription Entry Maintenance
Sometimes your uploaded prescription will be “invalidated” because it did not meet Medicaid requirements. If you go to Lookup>Child Lookup>Written Orders Tab, you can see an explanation under the Invalid Reason column if the prescription was invalidated. Please see example below. If your prescription was invalidated, it will go back on the Missing Prescriptions Report.
Summary of reasons why your prescription does not show as completed:
- The Prescription Image was not uploaded
- The coordinating orders were not checked when completing the Manage Prescription File screen (for the image)
- The Prescription Entry Details were not completed; or they were completed, but Preview, SAVE & DONE were not clicked to save the change(s).
- The coordinating enrollments for the prescription details were not checked on the Manage Prescription Entry Screen.
- The prescription was invalidated. New prescription should be uploaded.
Cannot find Ordering Provider using the NPI search
If you are unable to find the ordering provider using the NPI search please refer to this link: