A. How to create a schedule for the
school
1. Go to "Attendance" => "Classroom Schedule Maintenance", and click the "By Schedule" tab.
2. Click the drop-down on the top labeled “School Year Session” and make sure to select the correct school year.
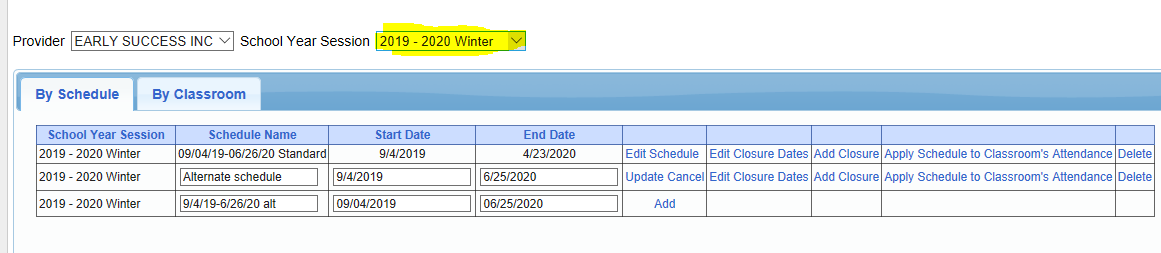
3. To enter a new schedule, on a new line, enter the schedule name, the start date, and the end date. Then, click "Add".

(The Schedule name
must be filled out, as well as the start and end dates.)
(If there are
alternative locations with a different schedule, those can also be entered on
this screen.)
DO NOT CREATE MULTIPLE SCHEDULES FOR MULTIPLE HOLIDAYS. A SCHEDULE SHOULD COVER THE WHOLE SEMESTER, WITH EVERY HOLIDAY AND BREAKS INSIDE AS CLOSURES, NOT SEPARATE SCHEDULES!
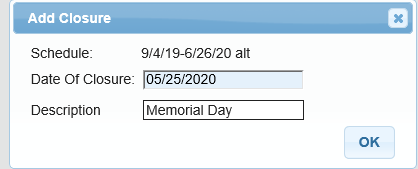
B. Adding School Closures
School closures can be added ahead of time to designate holidays or planned school closures/snow days.
1. To add closures to a schedule you created, click
“Add Closure”.

2. Add the date
of Closure as well as a description and click the “Ok” button.
Alternatively, you can also click on “Edit Closure date” to edit the closure already entered or add more closures. 
The Edit Closure Dates page will look like below: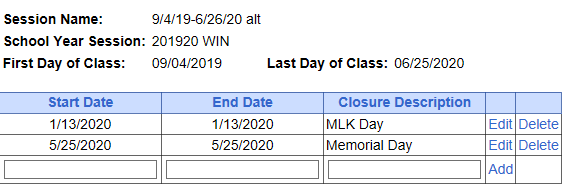
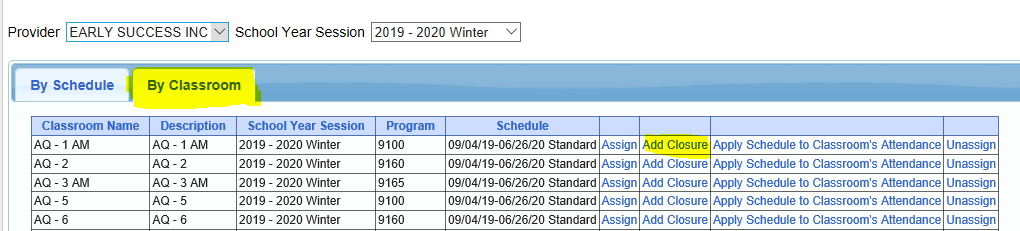
C. Applying a Schedule to a Classroom’s Attendance
1. First, go to the "By Classroom" tab, and assign a schedule to the classroom. To do so, click "Assign" and choose a schedule to assign. The 'Schedule" column for the classroom should be filled with the assigned schedule's name afterwards.
NOTE: PLEASE ENSURE YOU ARE ASSIGNING A SCHEDULE TO EACH CLASSROOM UNDER THE 'By Classroom' TAB, OR 'Apply Schedule to Classroom's Attendance' WILL NOT APPLY HOLIDAYS AND CLOSURES.
2. To apply the closures that you entered in the schedule, click "Apply Schedule to Classroom's Attendance".

3. The following screen will appear, and
here you can choose which month's closures you want to apply to the schedule, and it will show what dates have closures for the selected month. Click "OK" to apply the listed closures.
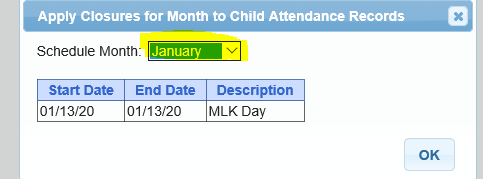
This message will appear.
 This can be done for every closure that has been entered for the school year, but you can only select and apply to months before the current month, including the current month. (You can't apply closures to a future month.)
At this point, the closures are applied to your classroom, and the closure dates will appear as dark grey boxes on your classroom attendance screen:
(The section below is an alternative method to apply closures to the classroom.)
D. Adding closure to Classrooms
It is the same process, but is done
under the "By Classroom" Tab.
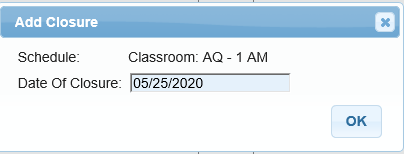
1. Go to the "By Classroom" tab and click "Add Closure".
2. Enter a closure date and click "OK".
3. Click "Apply Schedule to Classroom's Attendance" to apply the new closure that you just added.

Once you apply the schedule to the classroom attendance, this creates closure attendances based on the schedule you just created. These attendances need to be digitally signed the same way you would previously sign a Provided or Present session by going to Attendance>Digital Signature>Sign Classroom Attendance. See this knowledge base article for more information regarding signing classroom attendance:
http://support.cpseportal.com/kb/a5/classroom-attendance-instructions.aspx?KBSearchID=14662.