1. Bring in the Summary File for the school year the AVL is for.
- Maintenance>SED Data>Import Summary Data from CPSE Portal
-
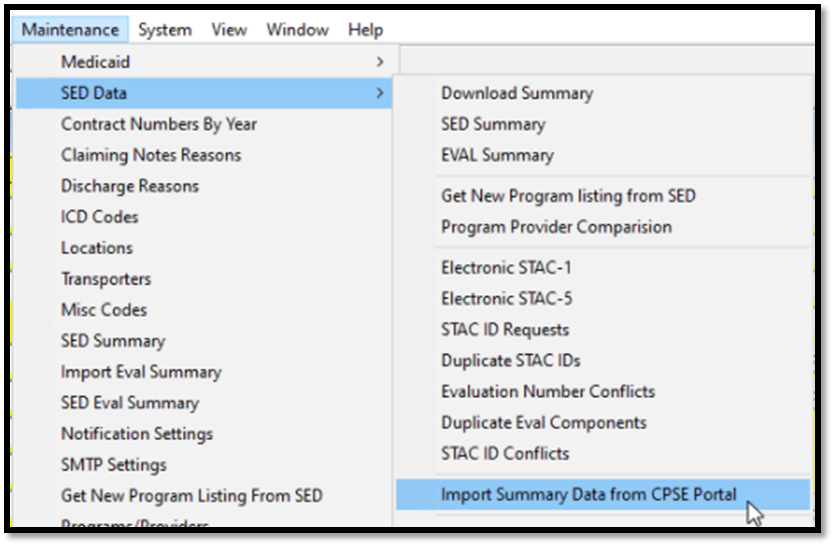
- Click Import Evaluation Summary, and Update Evaluations from SED Summary
2. Download the AVL you’re ready to work on.
Go to Claims>Load/Create Evaluation AVL
3. On the Load/Create Evaluation AVL screen, ensure that you are on the “Load Eval AVL” tab.
4. Double click on “FromSED”
5. Click “Download AVL File”
6. The Download Files from SED screen will show. Enter your SFTP/Go Anywhere Username and Password and click “Get Listing”
7. The EVAL-AVL files for your county will populate in the bottom grid. Typically, the file that you are looking for is the top one. Refer back to your email from NYSED to verify the file name if necessary, and select that file in the grid.
8. The selection will fill in the “File to Download” section – now click the “Download” button.
9. A confirmation window will open. Click “OK”
10. You will need to refresh your file list, as this is not a dynamic screen. To do so, double click on “EVAL-AVLText”
11. Double click back on “FromSED”
12. In the “SED AVL File:” panel, locate the file that you just downloaded. Once you’ve found it, highlight it.
13. Click the “Load AVL File” button on the right side of the screen.
14. Preschool will count down in the area above the “Download AVL File” button and show you how many records were loaded into Preschool that were on the AVL file. When it’s done, you’ll get a confirmation popup with an “OK” button again. Click “OK”
15. Click the “Match to Payments” button on the right side of the screen. A blue loading bar will show up at the bottom of the Load Create Evaluation AVL screen. The speed at which it travels will be wholly dependent on the number of Records Read in the previous step.
16. The “Records Read” will change over to “Records Processed” like so:
17. Close the “Load Create Evaluation AVL” screen by clicking the “Cancel” button.
18. Go to Reports>AVL/Claiming>AVL
19. In the bottom right hand corner of the reports that come up, click on the “Eval AVL” radio button, and then the “AVL Adjustments” button.
20. If you get the popup window depicted below, it simply means that there were no adjustments to worry about.
21. If a report window comes up with children’s names and amounts to recoup, please contact
PreschoolSupport@CPSEPortal.com for help with reconciling your adjustments.
22. Proceed to the menu option, Claims>Process Eval AVL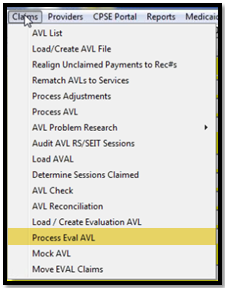
23. In the upper right-hand corner, five buttons and a single checkbox are available (Depicted below.) “Retrieve” will be the one that you use the most, and what you should click on now. The rest of the screen below will populate with the records that are available on this AVL, color coded according to what Preschool was able to do with them for you. Please see the next section for what the key/color coding means.
24. In the upper left hand corner there is a key that tells what each combination of background/text/font changes means (See right for key, and see below for explanation.)
- No Match – This is a problem and it is relatively rare; if you run across one of these you should reach out to PreschoolSupport@CPSEPortal.com for assistance, as there is likely something wrong with the child record and/or STACID.
|
- Child Match – Also problematic and relatively rare. Odds are that this child has had more than one STACID. You’ll want to reach out to PreschoolSupport@CPSEPortal.com for assistance in moving the payment(s)/correcting the offending STACIDs in order to be able to claim the money.
|
- Eval Match – NOT a problem. It is relatively common for a child to be recommended for an evaluation, and the parent decides not to take the child for the evaluation, or the family moves to another district/county etc. This can even be due to agencies that are slow billers.
|
- Payment Match – There are multiple reasons for this to show up. At it’s simplest, some components have been approved and others have not, although payments have been made on all of them. It will require some research to figure out what you’re able to claim from NYSED. If you need assistance, PreschoolSupport@CPSEPortal.com will be happy to assist you.
|
- Nothing to Claim – Exactly what it says. The evaluation was approved at SED. You paid the provider for doing the evaluation. You claimed that payment on a prior AVL. There is nothing left to do with this child or evaluation.
|
- All Claimed - The evaluation was approved at SED. You paid the provider for doing the evaluation. Preschool saw that the payment and the approval matched, and thus marked it to claim it for you on this AVL when you did the “Match to Payments” button on step 14.
|
- Part Claimed – This will never show up UNLESS you work a “Payment Match” section and partially claim some components but do not claim others.
|
25. You may close out of the Process Eval AVL screen now, and return to Reports>AVL/Claiming>AVL

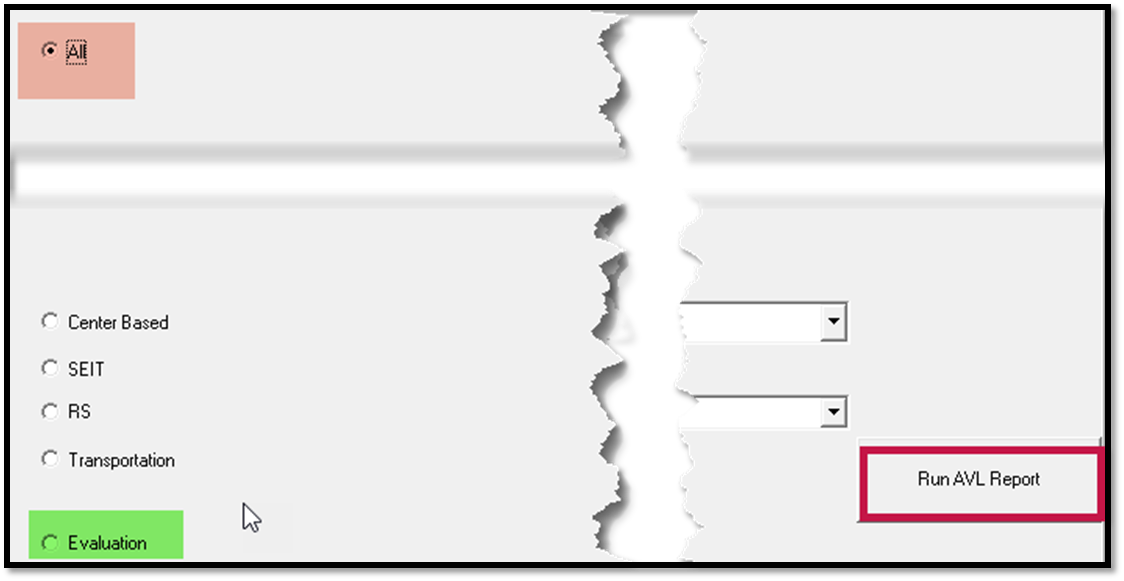
26. By default, “All” will be checked for the AVL Detail report (highlighted in red below). You will want to change it to show “Evaluation” (highlighted in green below.) Then, click the “Run AVL Report” outlined in red.
27. You can either choose to print or download this report. Just be aware that you will only be able to pull up this report from this location, until you load another AVL into Preschool. So you will want to save a copy somewhere for your records.
28. Remember to take a screenshot of the last page of this report. It will be helpful when composing the email to NYSED letting them know that you’ve submitted the AVL for processing, and taking a screenshot rather than manually entering the numbers yourself helps to reduce confusion/typographical errors.
29. The AVL Breakdown Report has “Service” selected as the default for the report date category splits. You can change it to Check or Invoice if you wish, but most people do not. The AVL is listed by number in the dropdown for this report (depicted below) but you’ll want to make sure that you’re selecting the appropriate AVL in the dropdown if you are running both an Evaluation and a Service AVL at the same time. Then click the “Run AVL Breakdown Report”
30. You can either choose to print or download this report. You will likely want to save a copy somewhere for your records.
31. The Adjustments section of reporting should have been checked prior to starting the AVL. If you did NOT have any evaluation adjustments, you don’t need to run this again. If you do, please ensure to change the radio button to reflect “Eval AVL” and then click the “AVL Adjustments” button.
32. You can either choose to print or download this report. Just be aware that you will only be able to pull up this report from this location, until you load another AVL into Preschool. So you will want to save a copy somewhere for your records.
33. This screen can be closed by either hitting “Cancel” at the bottom center, or the little X below the main X in the upper right hand corner.
34. Return to the menu option, Claims>Load/Create Evaluation AVL
35. Typically, the screen that loads should be the “Create Return” tab of “Load Create Evaluation AVL” – But sometimes, Preschool will load the “Load EVAL AVL” tab instead. If you do not see the buttons in the screenshot to the right, please select the “Create Return” tab in the upper right hand corner of the window. (Pictured below) to get to the necessary buttons.
36. Click the “Create AVL Return File” button. You will see an on-screen countdown of the number of records being parsed by Preschool. Don’t worry about what this number is.
37. Click the “SFTP File to SED” button. This will pop up a new modal window, looking for your SED File Transfer Manager username and password. This is also sometimes known as your GoAnywhere username and password.
38. A new window will pop up, asking if you want Preschool to auto-generate an email to NYSED for you. Click “Yes” and Preschool should open your Outlook application, and a new email window with the file name and county information already filled in for you.
39. This is where you should paste the screenshot from step 28. Don’t forget to add your Outlook signature, or at the very least your name and contact information for NYSED.
40. You will want to include Robert Wojtkiewicz and Nicholas Thayer on the same line with the OMSSTAC general email. If you need to copy anyone internal to your county, add them to the BCC line now as well. We will get a copy here as well, if you don’t remove the auto-generated addresses.
41. Click “Send”